The Samsung Galaxy S24 Ultra is undoubtedly an exceptional phone that offers customizable OEM, impressive camera attributes, and powerful hardware configuration. All of those factors make a tempting deal if you are interested in unlocking the root access.
In this post, we will cover the complete tutorial to root Samsung Galaxy S24 Ultra using magisk. There are two methods, the first process includes TWRP recovery, whereas you can gain root permission without recovery too. With that said, let’s swiftly move toward the rooting process!
Table of Contents
Root Samsung Galaxy S24 Ultra with TWRP Recovery
Generally, if you are choosing the method to root your Samsung Galaxy S24 Ultra through a custom recovery, the TWRP recovery would be the best option. TWRP recovery (Team Win Recovery Project) usually helps in flashing custom ROMs, Magisk Zip, and other mods.
Disclaimer: The upcoming process will violate the Samsung phone’s warranty and make the usage unstable. Therefore, it’s suggested to proceed with caution and grasp rooting your phone risks.
Before proceeding to the steps section, it is imperative that you back up your Galaxy S24 Ultra to prevent the loss of crucial data.
Step 1: Install TWRP Recovery
The process of TWRP installation is a tedious procedure in itself. Hopefully, we covered the entire guide on how to install TWRP recovery on your Samsung Galaxy S24 ultra. So, browse through the following article to know more details.
TWRP Guide: How to Install TWRP on Samsung Galaxy S24 Ultra
Step 2: Flash Magisk zip File with TWRP
We are assuming that you have completed the TWRP recovery installation guide. Now, let’s head toward the instructions to flash the magisk zip file using the custom recovery.
For those who don’t know, Magisk plays as a centerpiece to gain root access. Thus, we recommend you download the magisk zip before getting started!
Once you have downloaded the magisk ZIP file on your phone, follow the steps to flash this file without any further ado!
- Boot your device into the TWRP Recovery.
- Click on the “Install” button that appears in the Recovery.
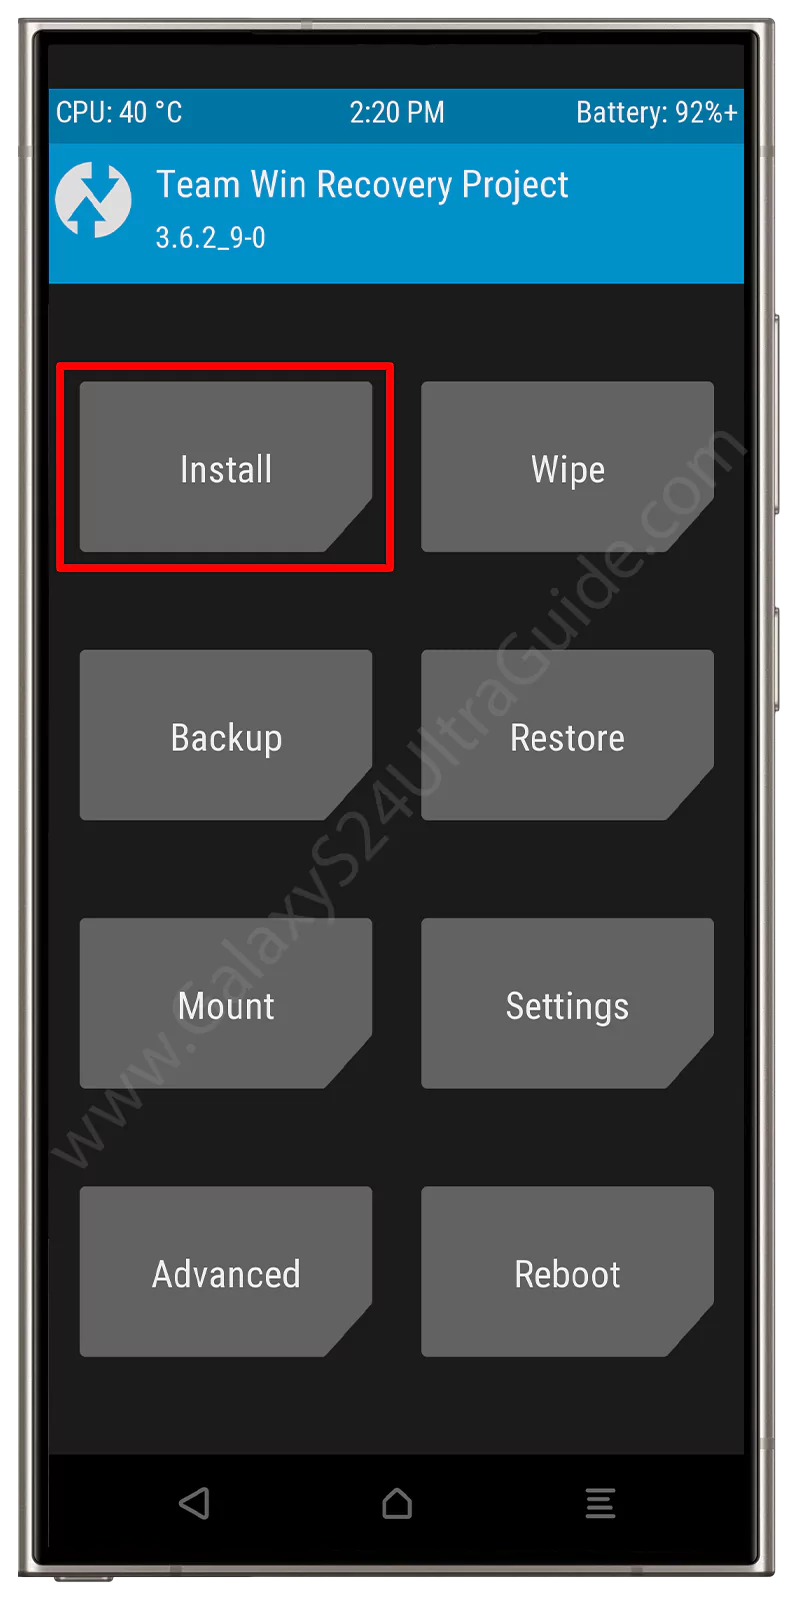
- Now, navigate to the “Magisk Zip” file download location.

- Select the file and Swipe to confirm the flashing step.

- TWRP will take a few minutes to flash the Magisk Zip file.

- Once everything ends, restart your Galaxy smartphone.
- Finally, install the Magisk app and access root permissions.
From the above guide, you will successfully root your device! You can reconfirm this by downloading the Root Checker app too.
Rooting Samsung Galaxy S24 Ultra without TWRP Recovery
It’s also possible to root the Samsung Galaxy S24 Ultra device even without using the custom recovery.
However, the overall process would be more complicated as compared to rooting with a recovery option. But still, if you carefully follow the instructions, you won’t face any trouble in the long run.
Step 1: Enable Developer Options
In this section, you will understand the whole process of booting your device into developer options.
- Launch the “Settings” app on the Samsung Galaxy S24 Ultra.
- Following this, scroll down and select “About Phone”.
- Next, you need to click on the “Software Information”.
- Now, tap on the build number more than 5–6 times.
- Finally, Enter your phone’s PIN or Pattern combination.
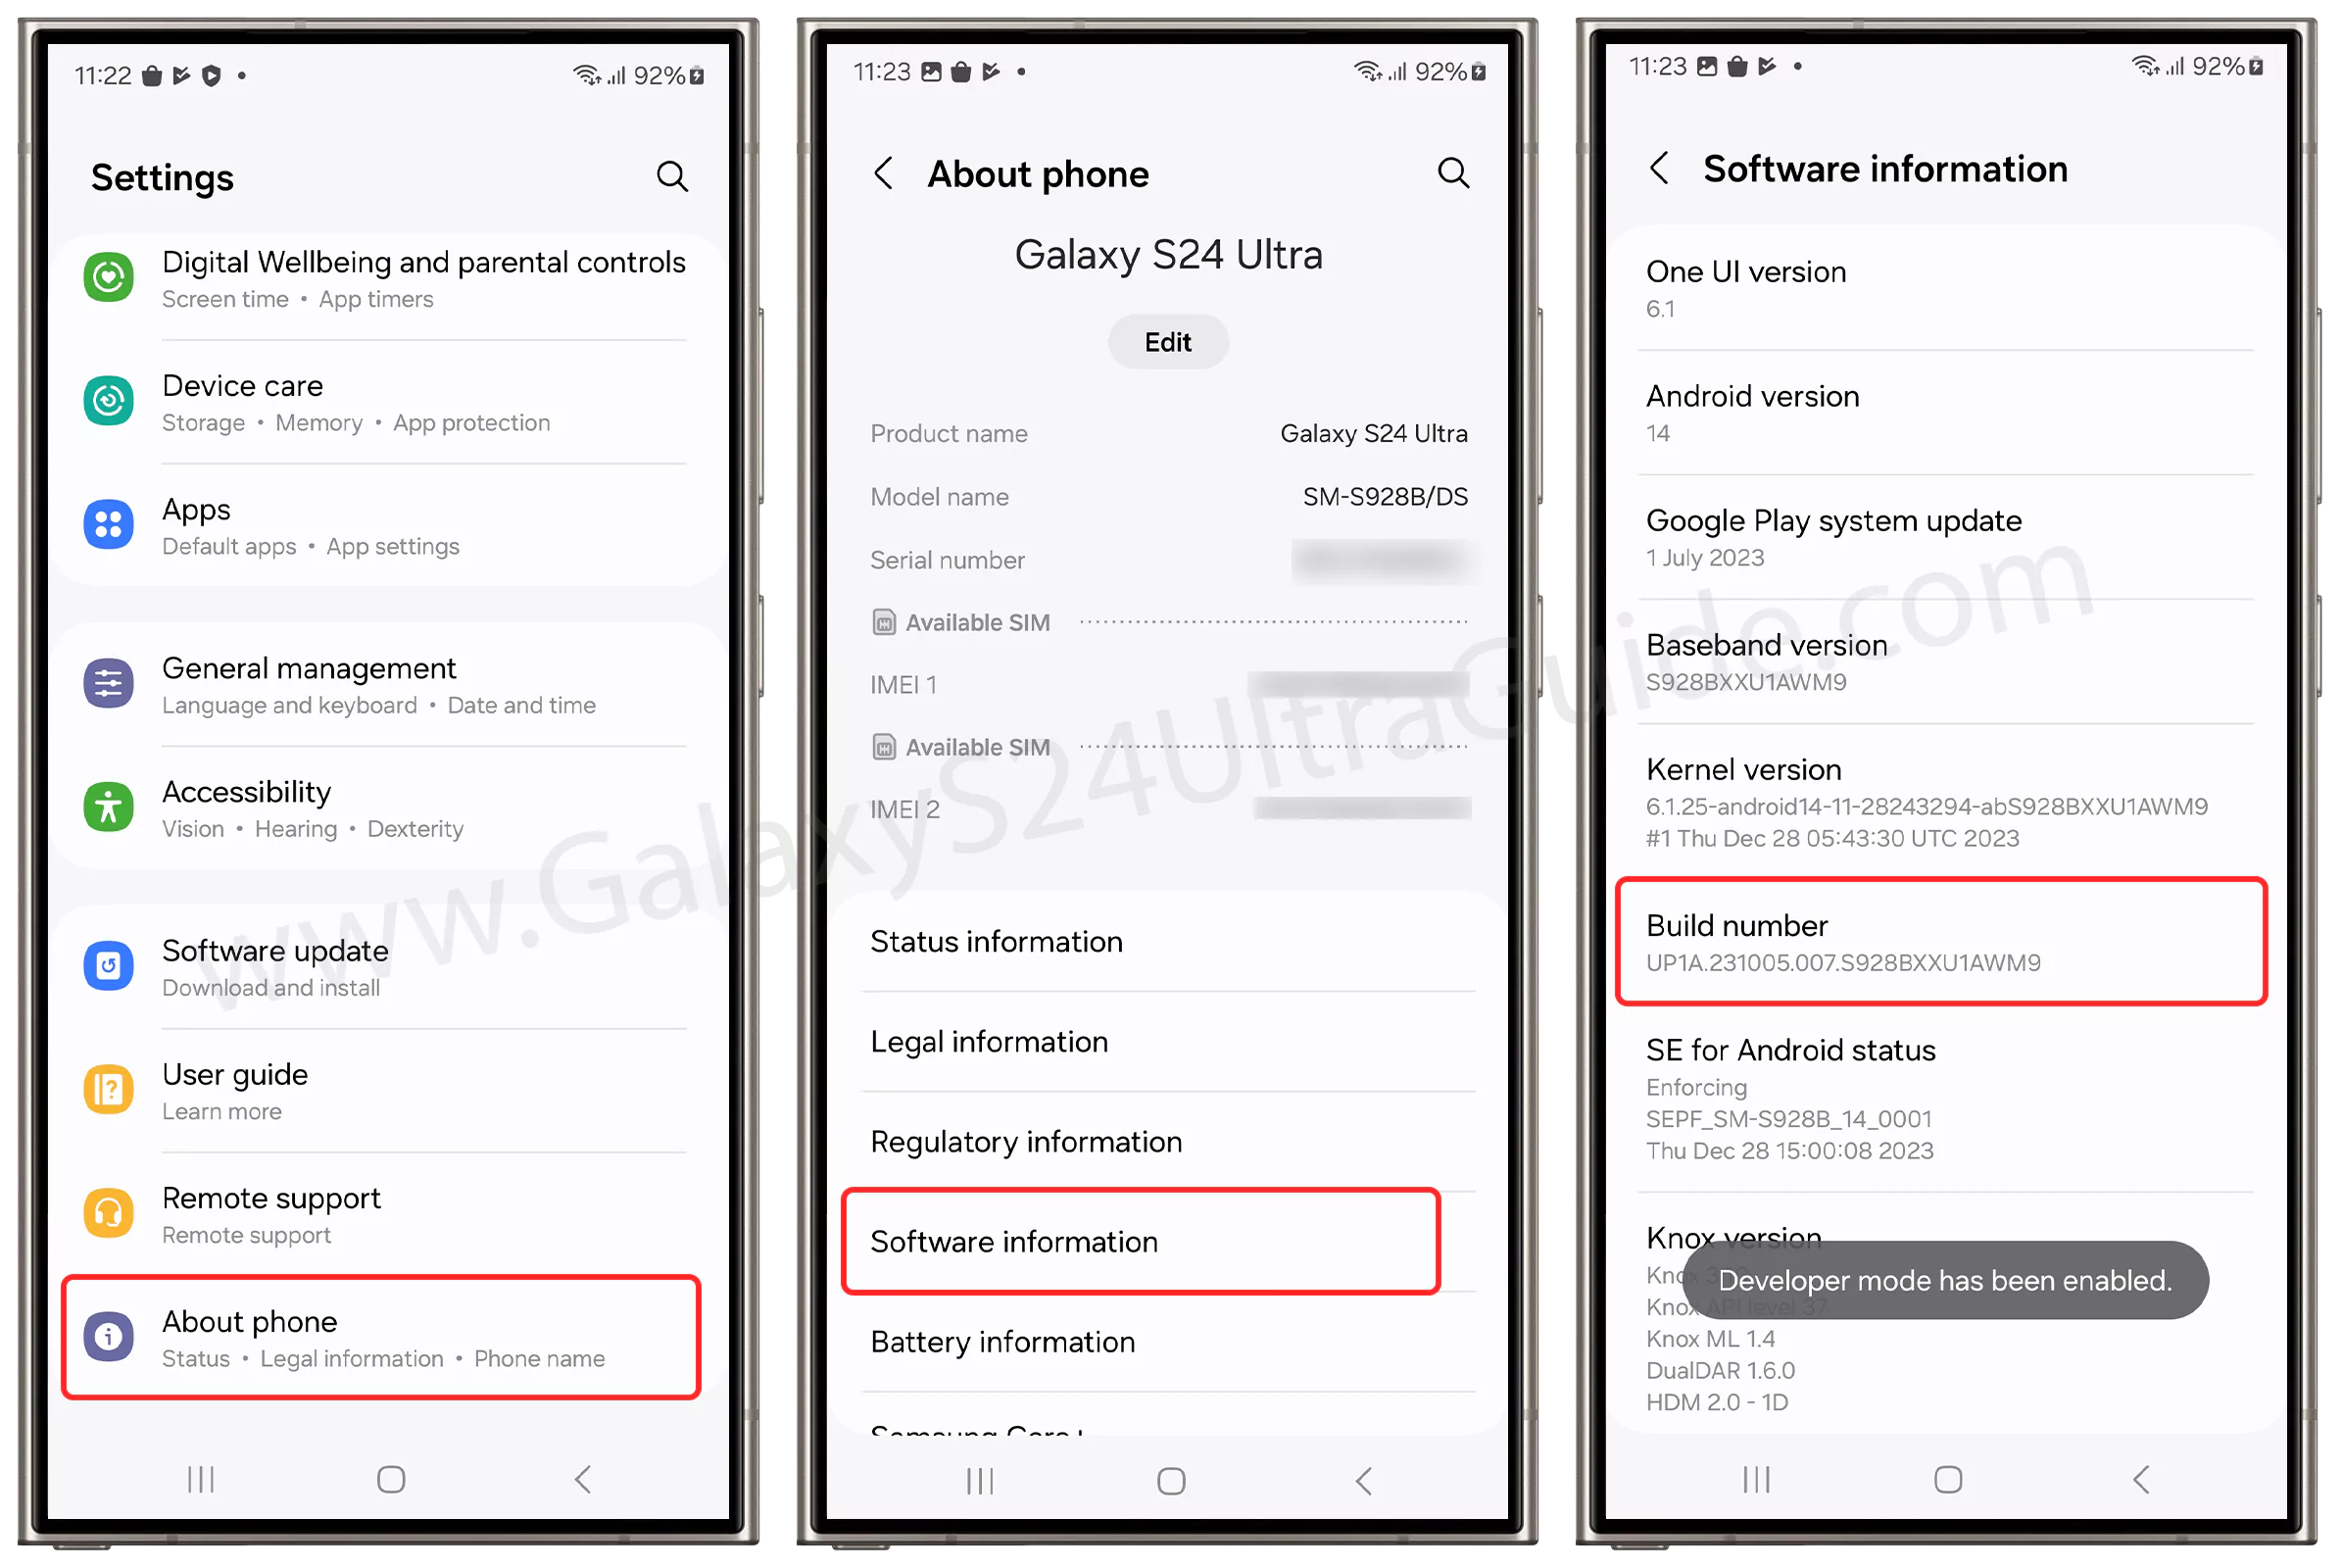
Through this, you will gain developer mode access. If you notice a pop-up message of “Developer mode has been enabled!”, you have completed the process.
Step 2: Access OEM Unlocking Settings
The next instruction for rooting would be enabling the OEM unlocking options from the Settings menu. Follow the given steps:
- Open the “Settings” App
- Navigate to the “Developer Option”.
- Enable the Toggle of the “OEM Unlocking” option.
- Confirm the process by clicking on the “Enable” option.
- Scroll down and Enable “USB Debugging”.
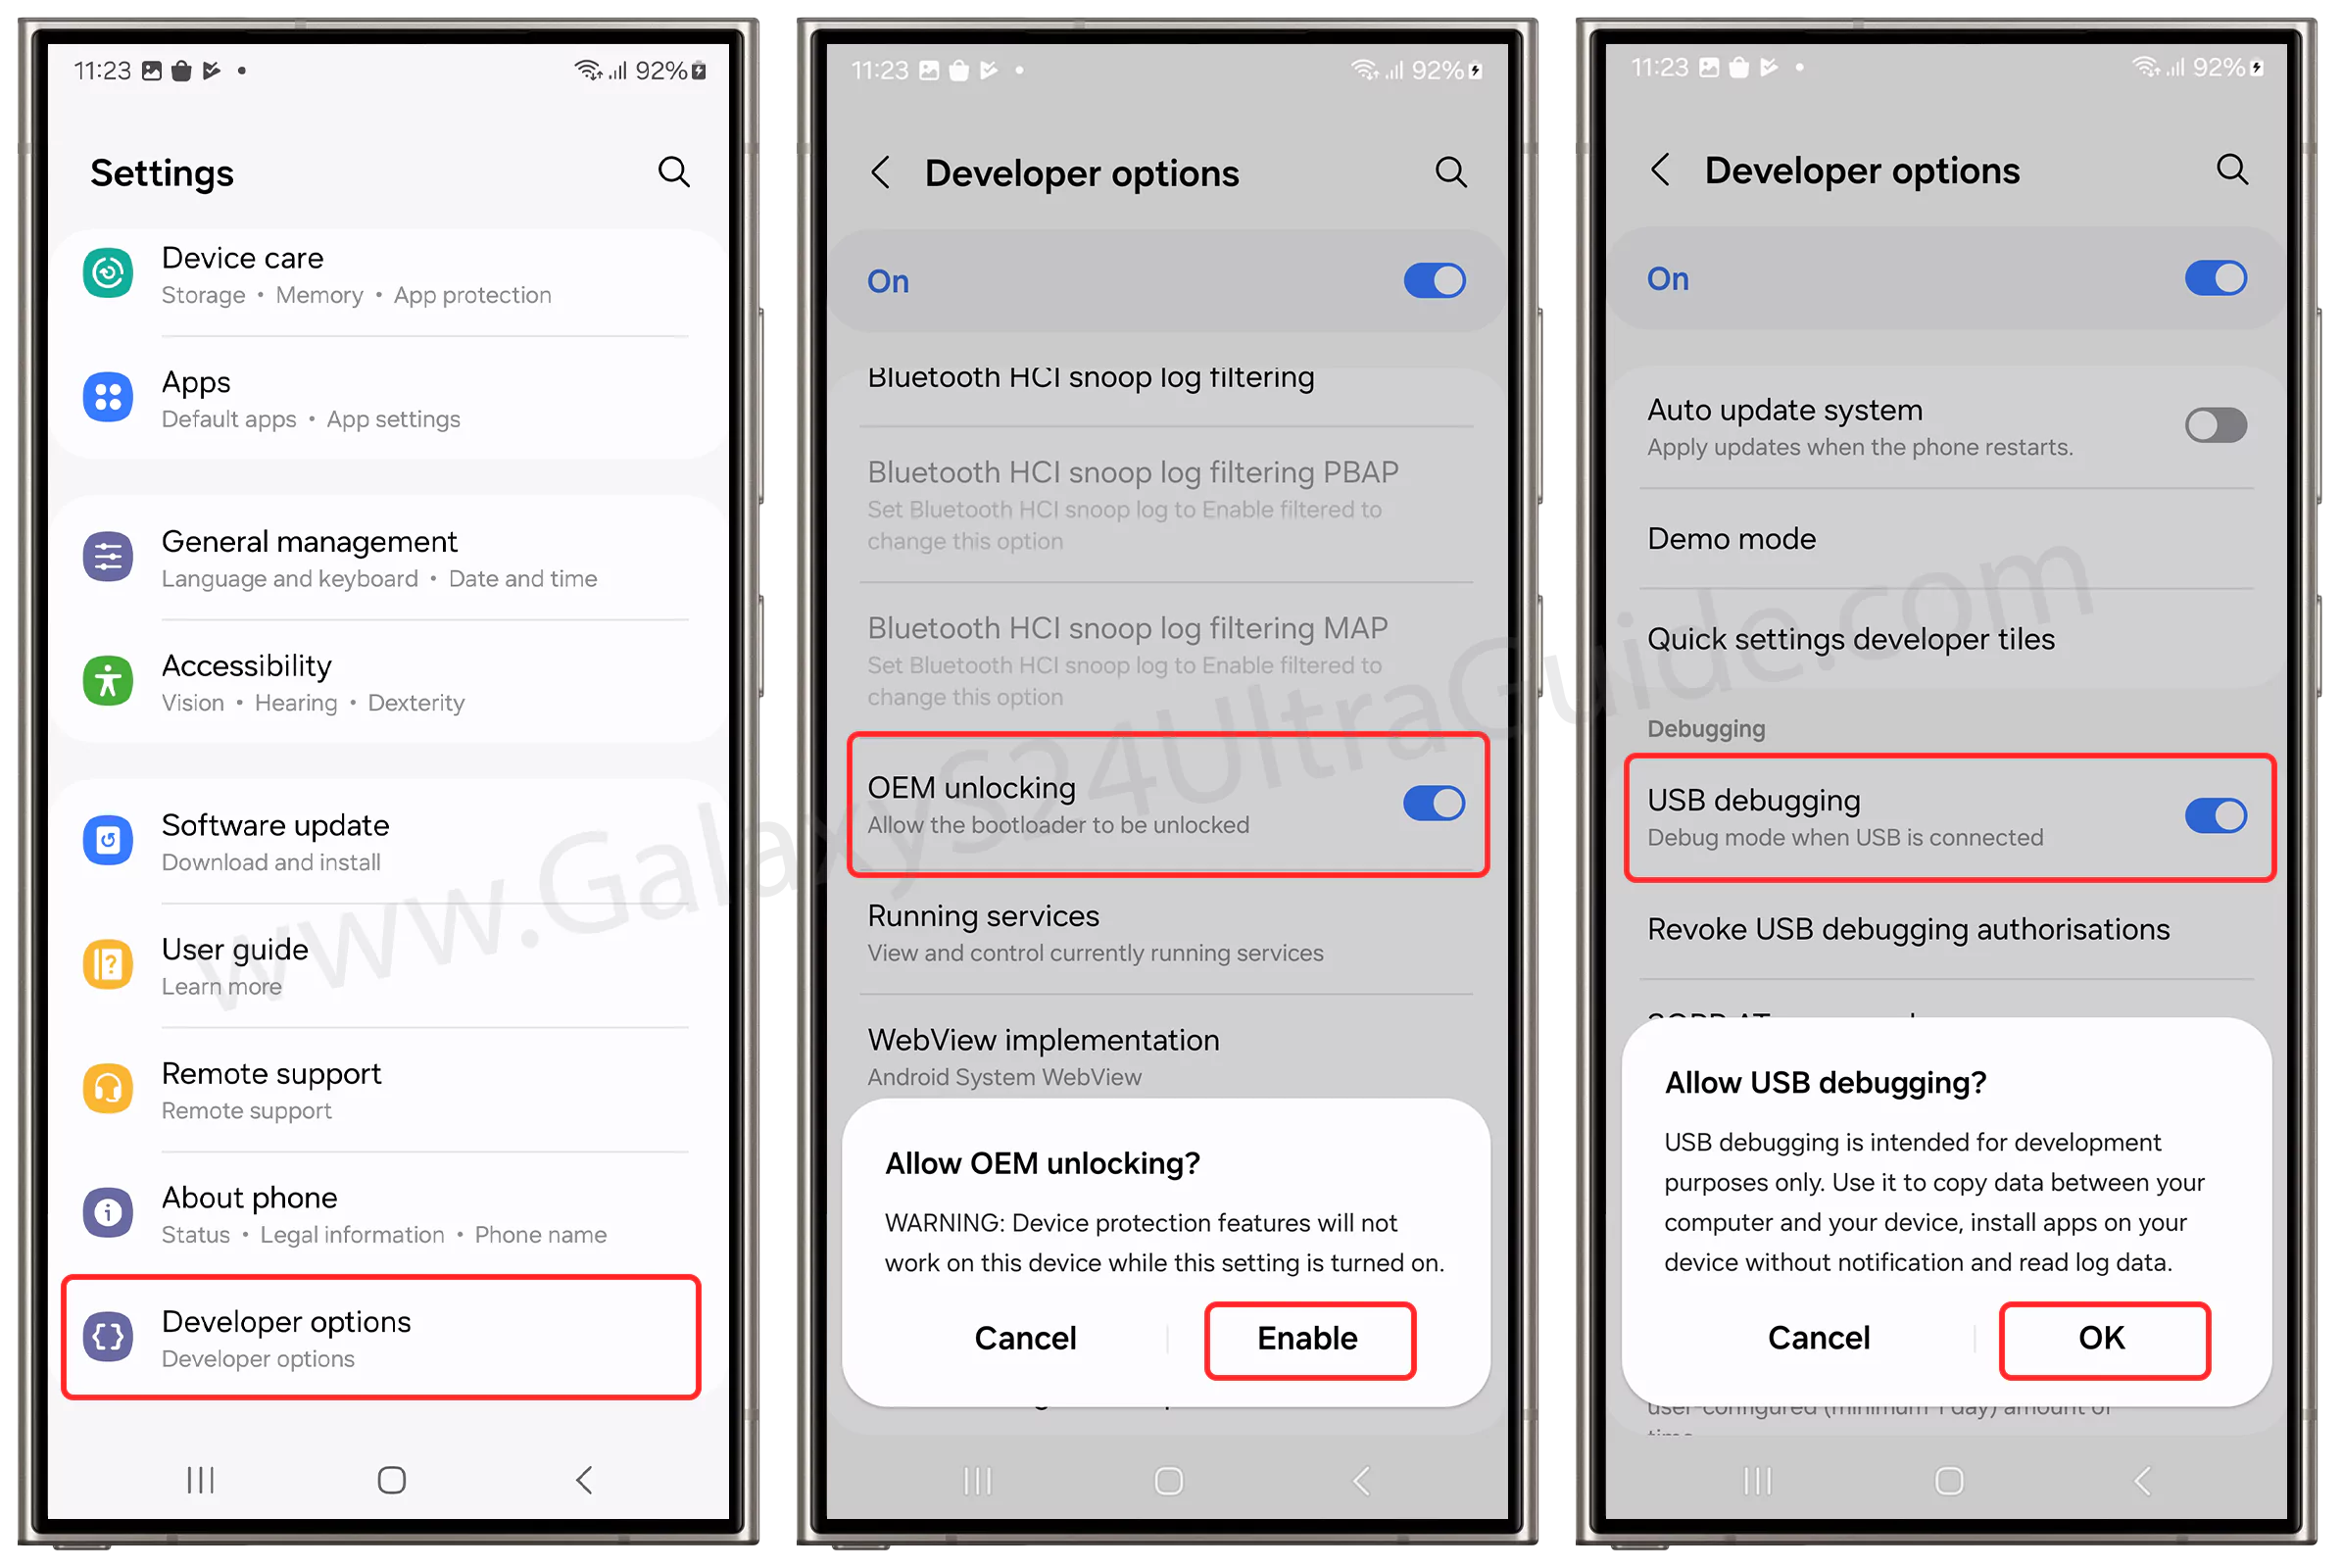
From here onward, we will move toward the instructions to unlock your Samsung Galaxy S24 Ultra bootloader.
Step 3: Unlock the Bootloader Configuration
Warning: Currently, there’s no known method to unlock the bootloader for the North American Galaxy S24 series phones. It includes Canadian models that end with W and United States U and U1 smartphone models. Long story short, you can’t root those phones using a patched magisk file.
Once you have enabled the OEM Unlocking settings, it’s suggested to follow the steps to unlock the Samsung Galaxy S24 Ultra bootloader.
- Turn off your Samsung Galaxy S24 Ultra.
- By pressing and holding “Volume down + Power” button, then select “Power Off”.
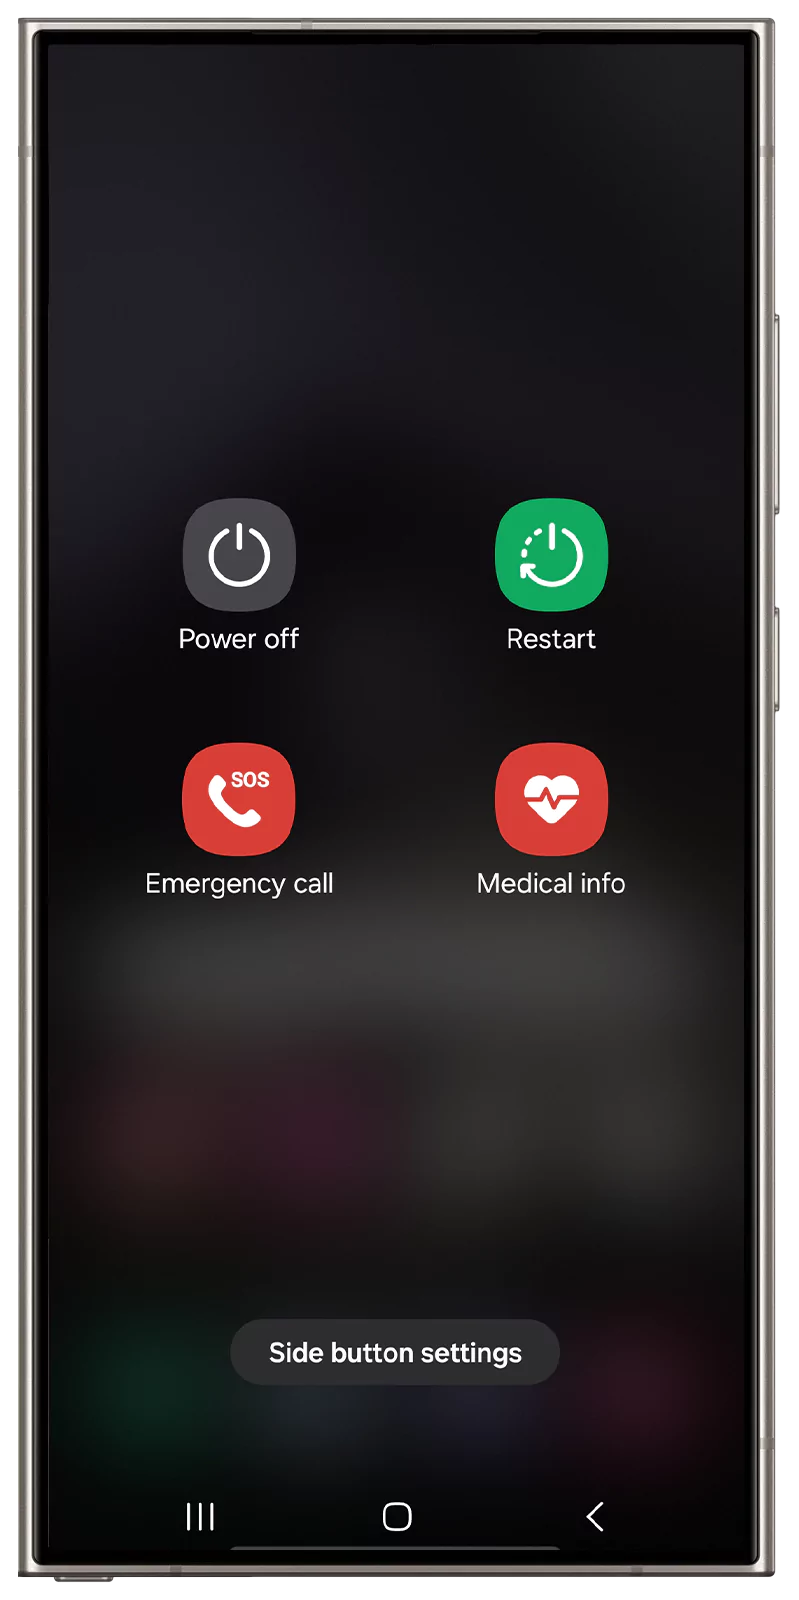
- By pressing and holding “Volume down + Power” button, then select “Power Off”.
- Long Press the “Volume Up + Down” buttons.
- Hold both buttons and connect the device to the PC/laptop using a original USB cable.
- With this, the bootloader warning will appear on the screen.
- Release both volume buttons and long press Volume Up to unlock the bootloader.
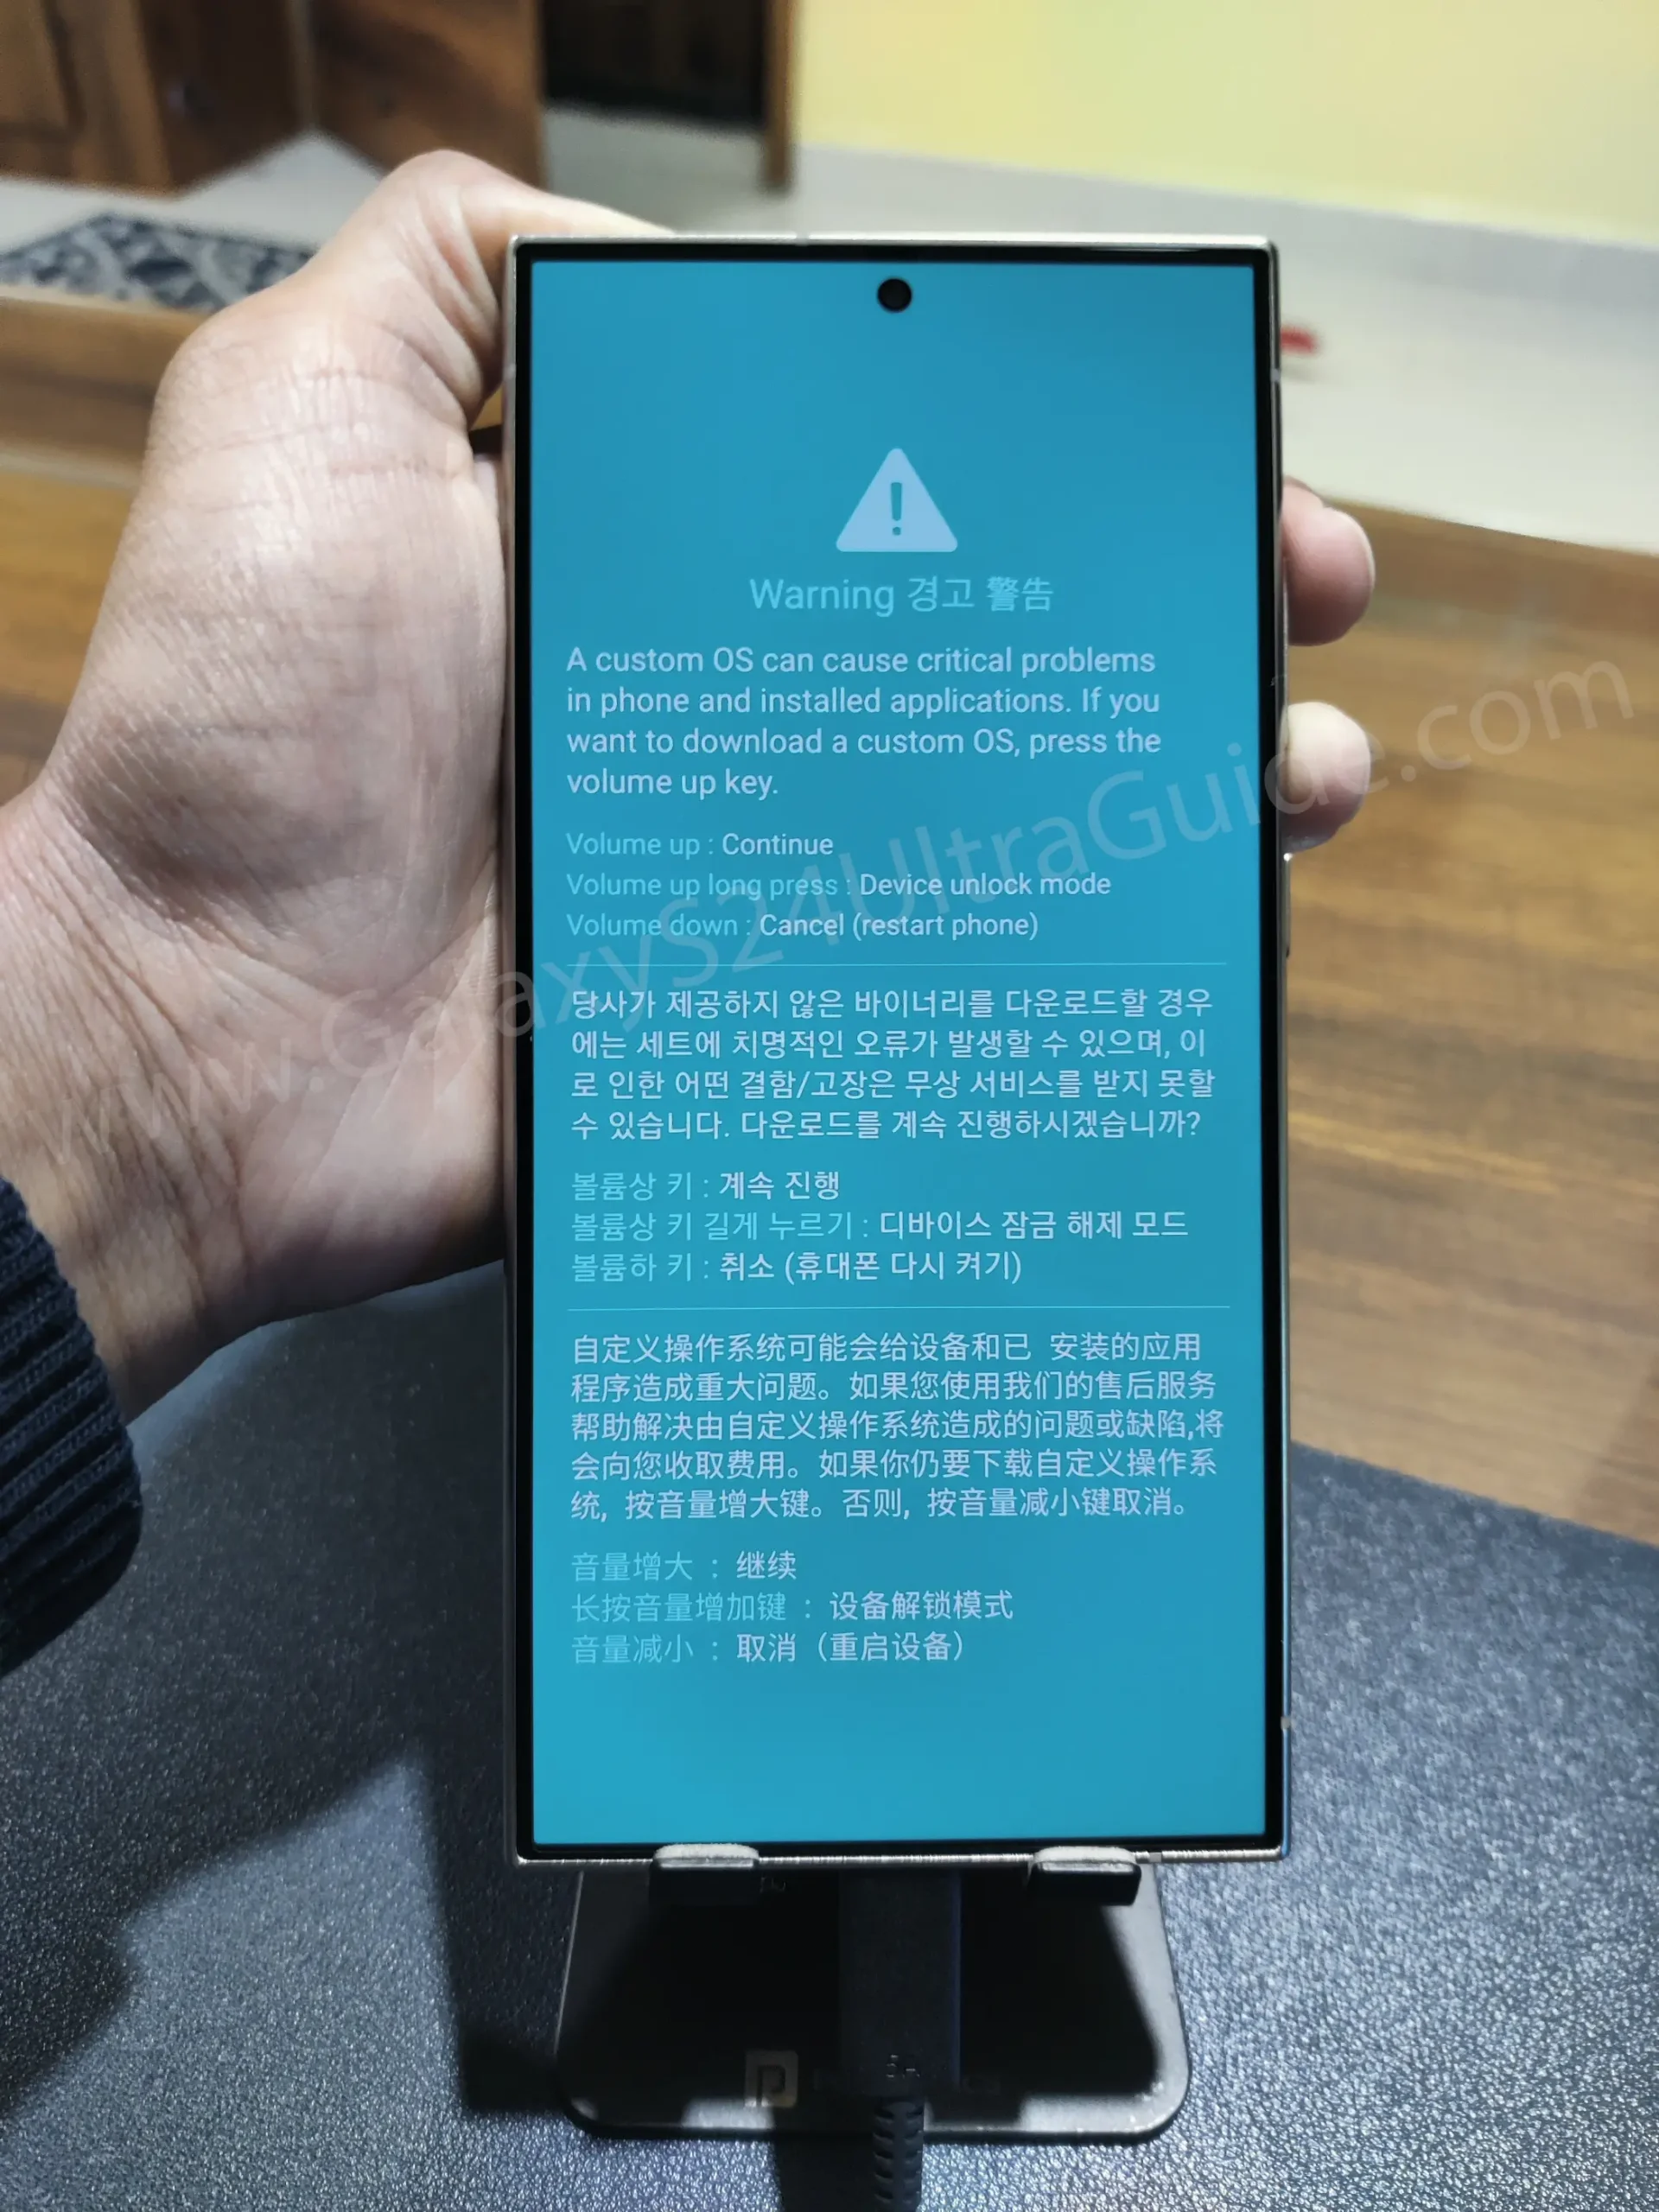
- Again, press “Volume Up” button to confirm Unlocking the bootloader.
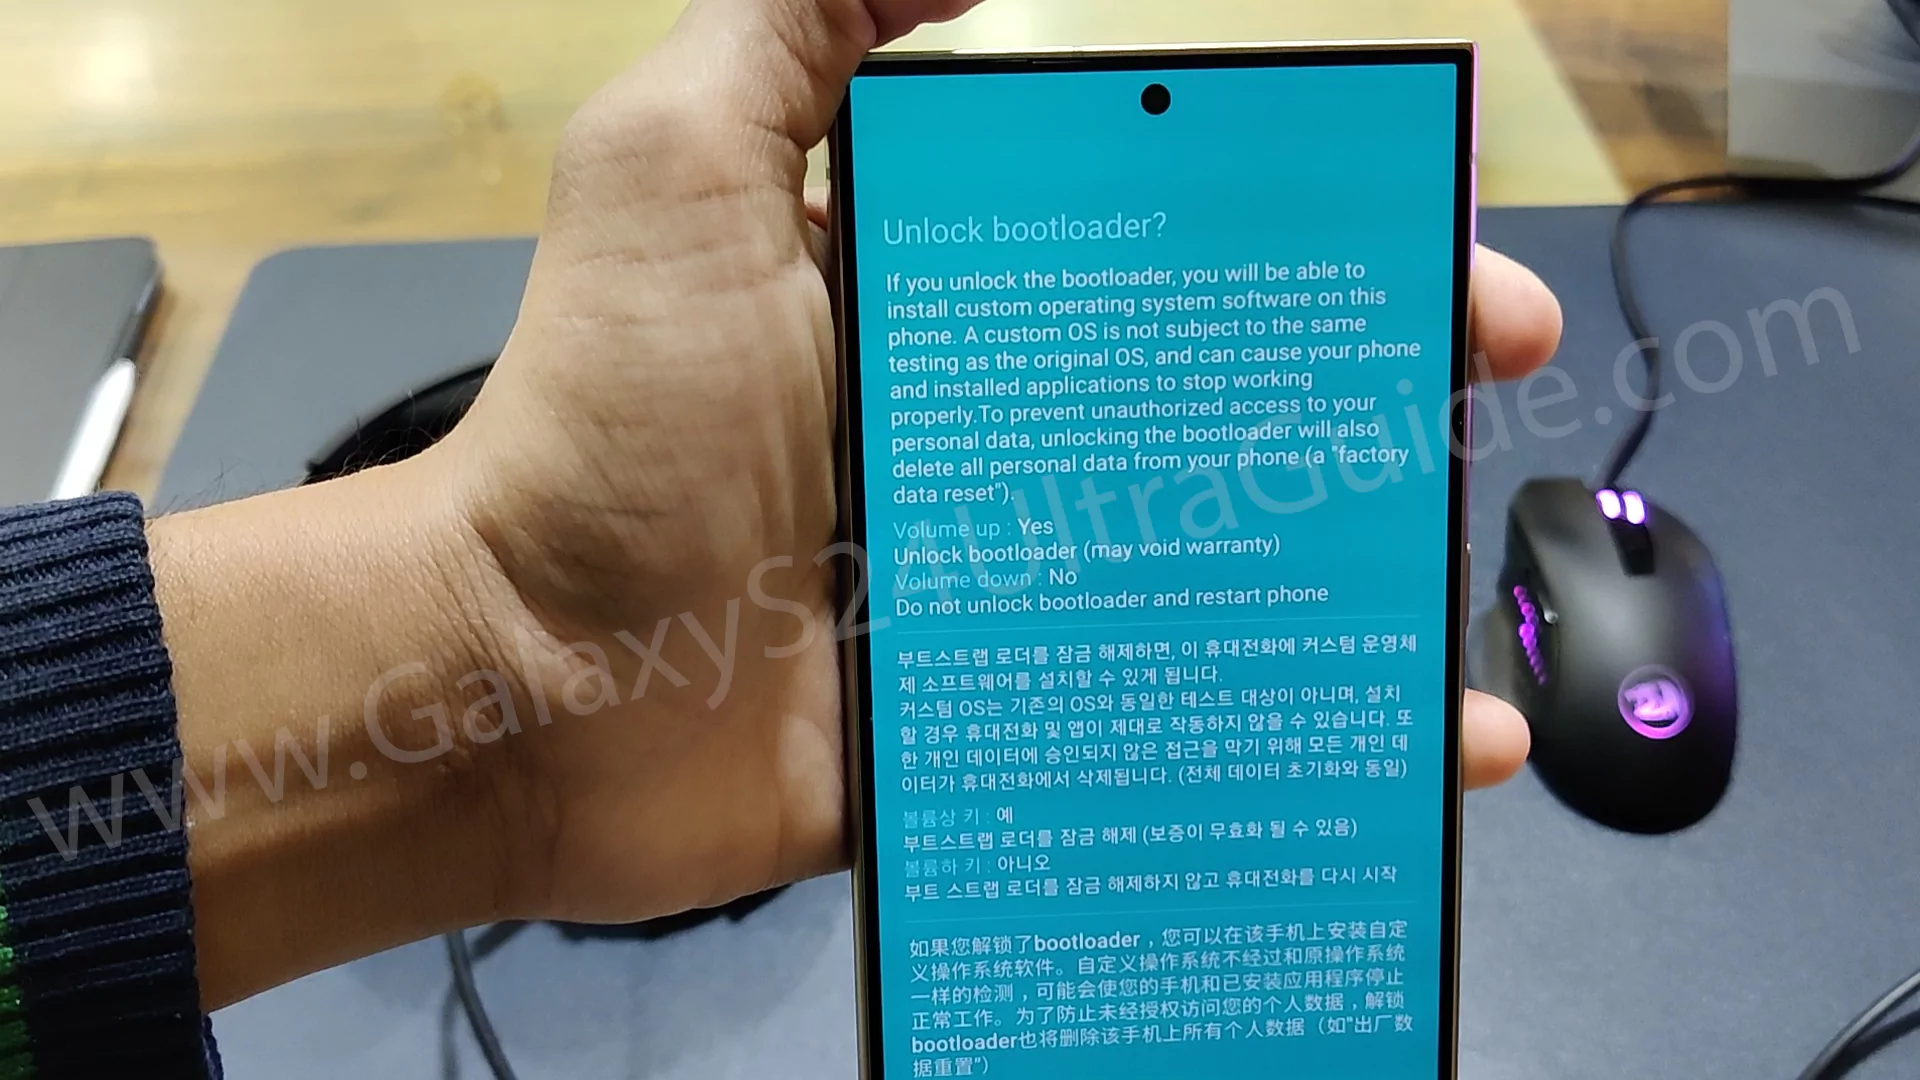
- All Done! Your Samsung Galaxy S24 Ultra bootloader has been unlocked successfully.
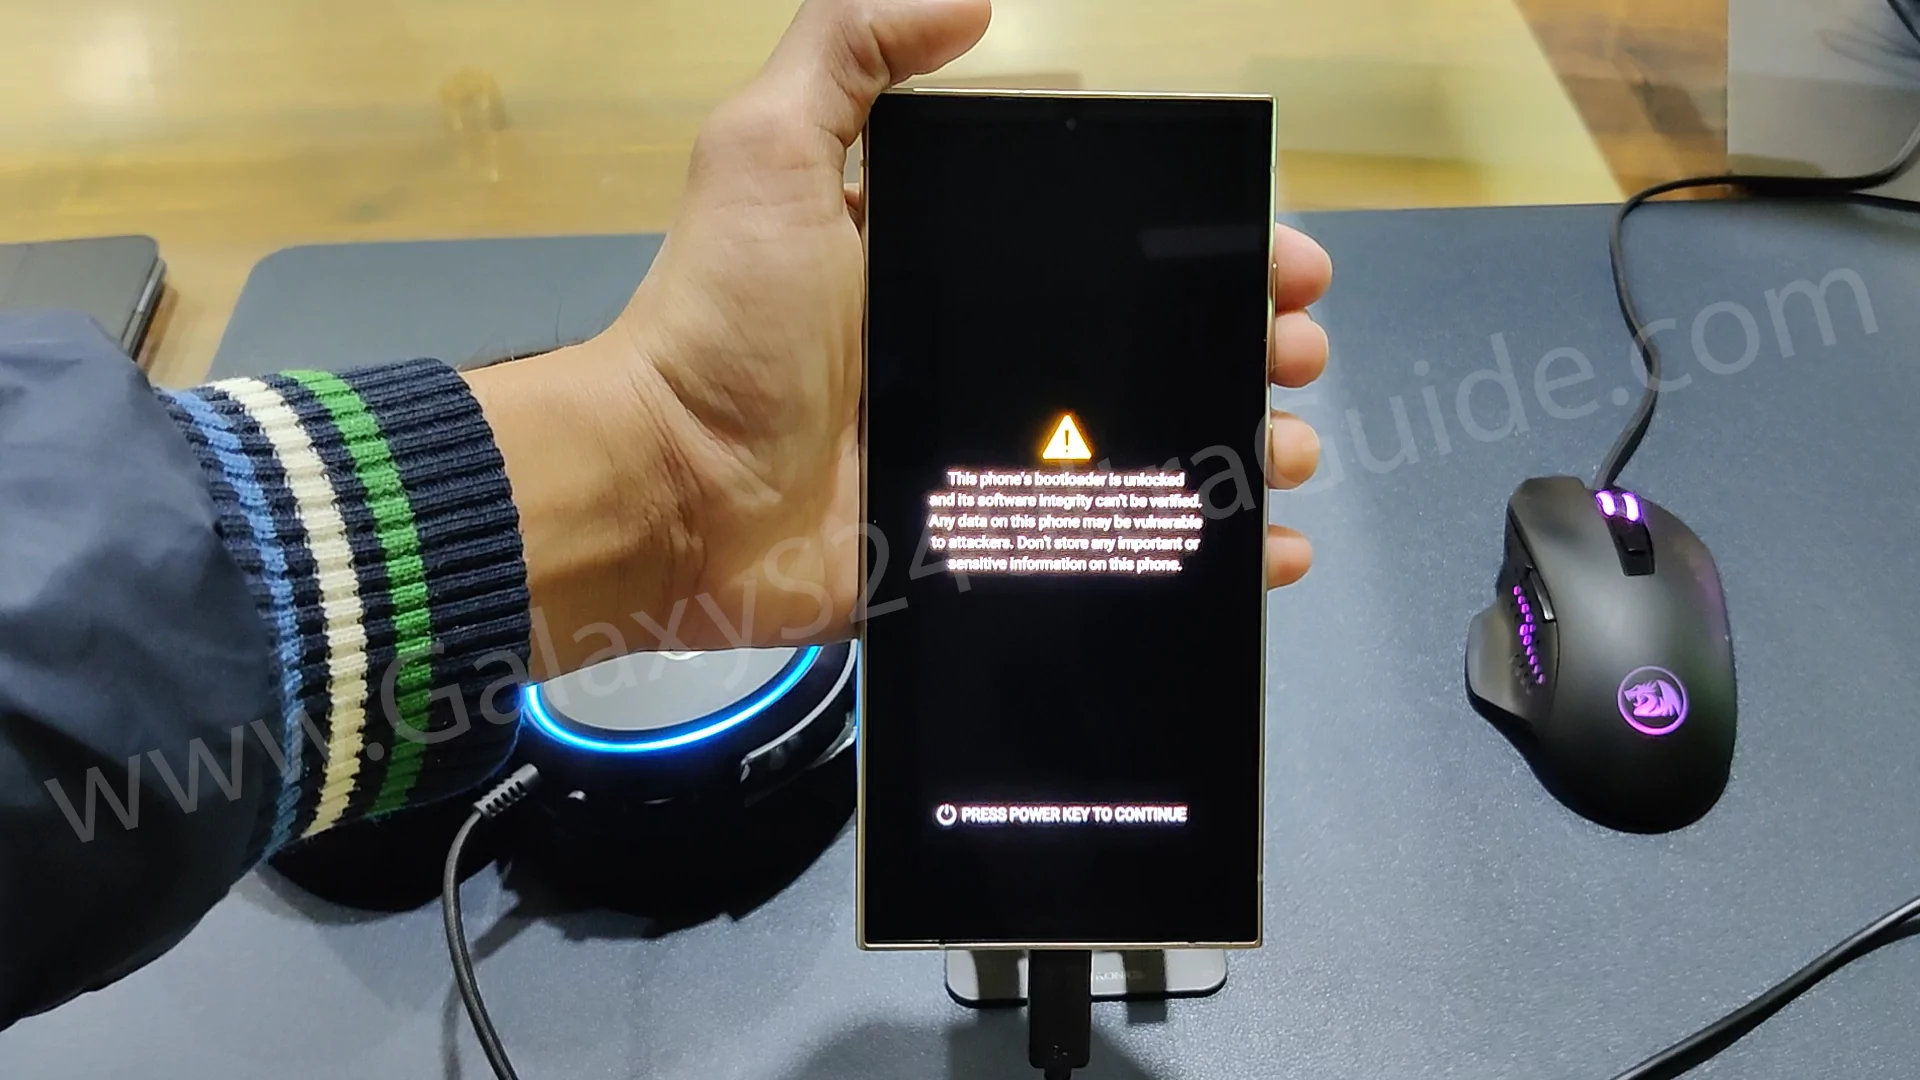
Note: If you press the Volume Up button after the bootloader warning, the software data will be erased, trip Knox Security, and disable software updates. Thus, we suggest you take complete backup.
Related Guide: How to Relock Bootloader on Samsung Galaxy S24 Ultra
Step 4: Download Samsung Stock Firmware
The next instruction for you is to get the correct version of the stock firmware. Typically, finding authentic firmware is slightly difficult.
But if you want to download the Samsung Galaxy S24 Ultra stock firmware, you should consider using the Frija tool. For that, download the latest version of this tool from below!
To use this tool, you need to acquire two things. The first one is the model number and the second one is the CSC code.
You can find the CSC code in the Settings → About Phone → Software Information, while the model number will found in the Settings → About Phone section.
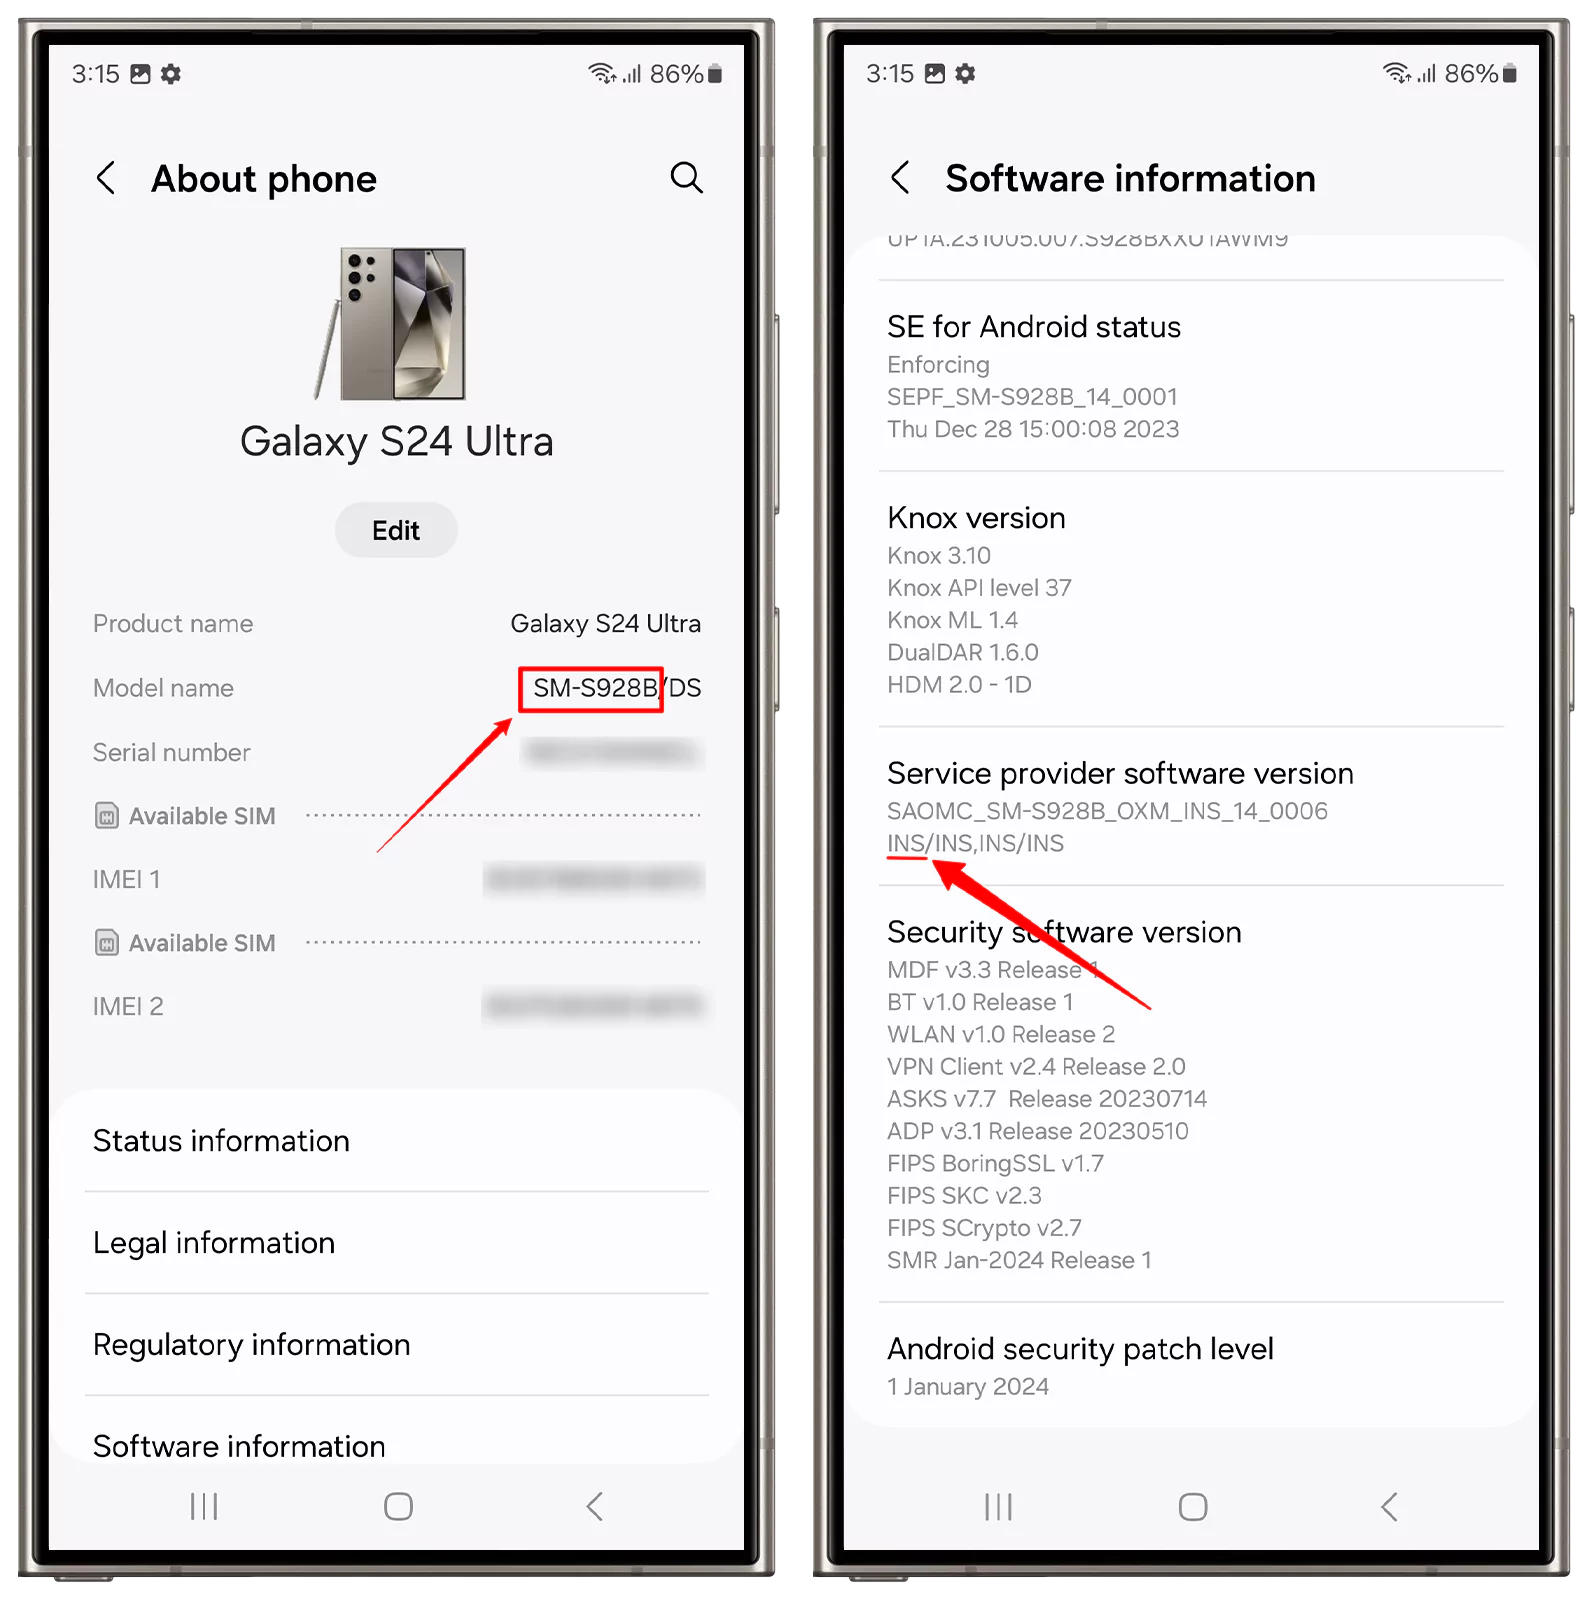
Once you have obtained that information, you can follow the steps:
- Launch the Frija Tool on your PC/laptop.
- Enter the Phone model, CSC code and IMEI/SN (Serial Number) in the tool.
- Enable the Auto option and tap on the “Check Update”.
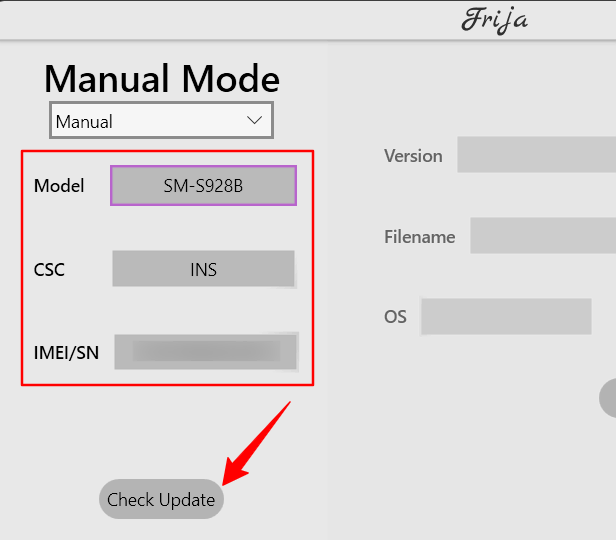
- Finally, click on the “Download” button to receive firmware.
Step 5: Extract and Patch the Boot file via Magisk
There are two things that you need to perform after downloading the firmware file, including extracting and patching the AP file using magisk. Follow the subsequent instructions cautiously.
Extract Firmware File
- Unzip the recently downloaded Samsung firmware zip.
- Open the firmware folder and look for the AP files.
- Now, transfer this AP firmware file to your phone’s internal storage.
Patched AP File using Magisk
You will require a magisk app for patching the AP firmware file. Magisk is a third-party solution for rooting the majority of Android phones and is one of the safest methods available. Worry not! Download and install the latest version from below!
- Launch the Magisk app on your phone
- Tap on the “Install” button that appears in the Magisk section.
- Now, click on the “Select and Patch a file” from the option.
- Select the “AP firmware” file that you recently copied from the PC.
- Once the AP file patching process completes, you can notice a pop-up message.
- Next, go to the Download folder and transfer this new magisk patched file to your PC.
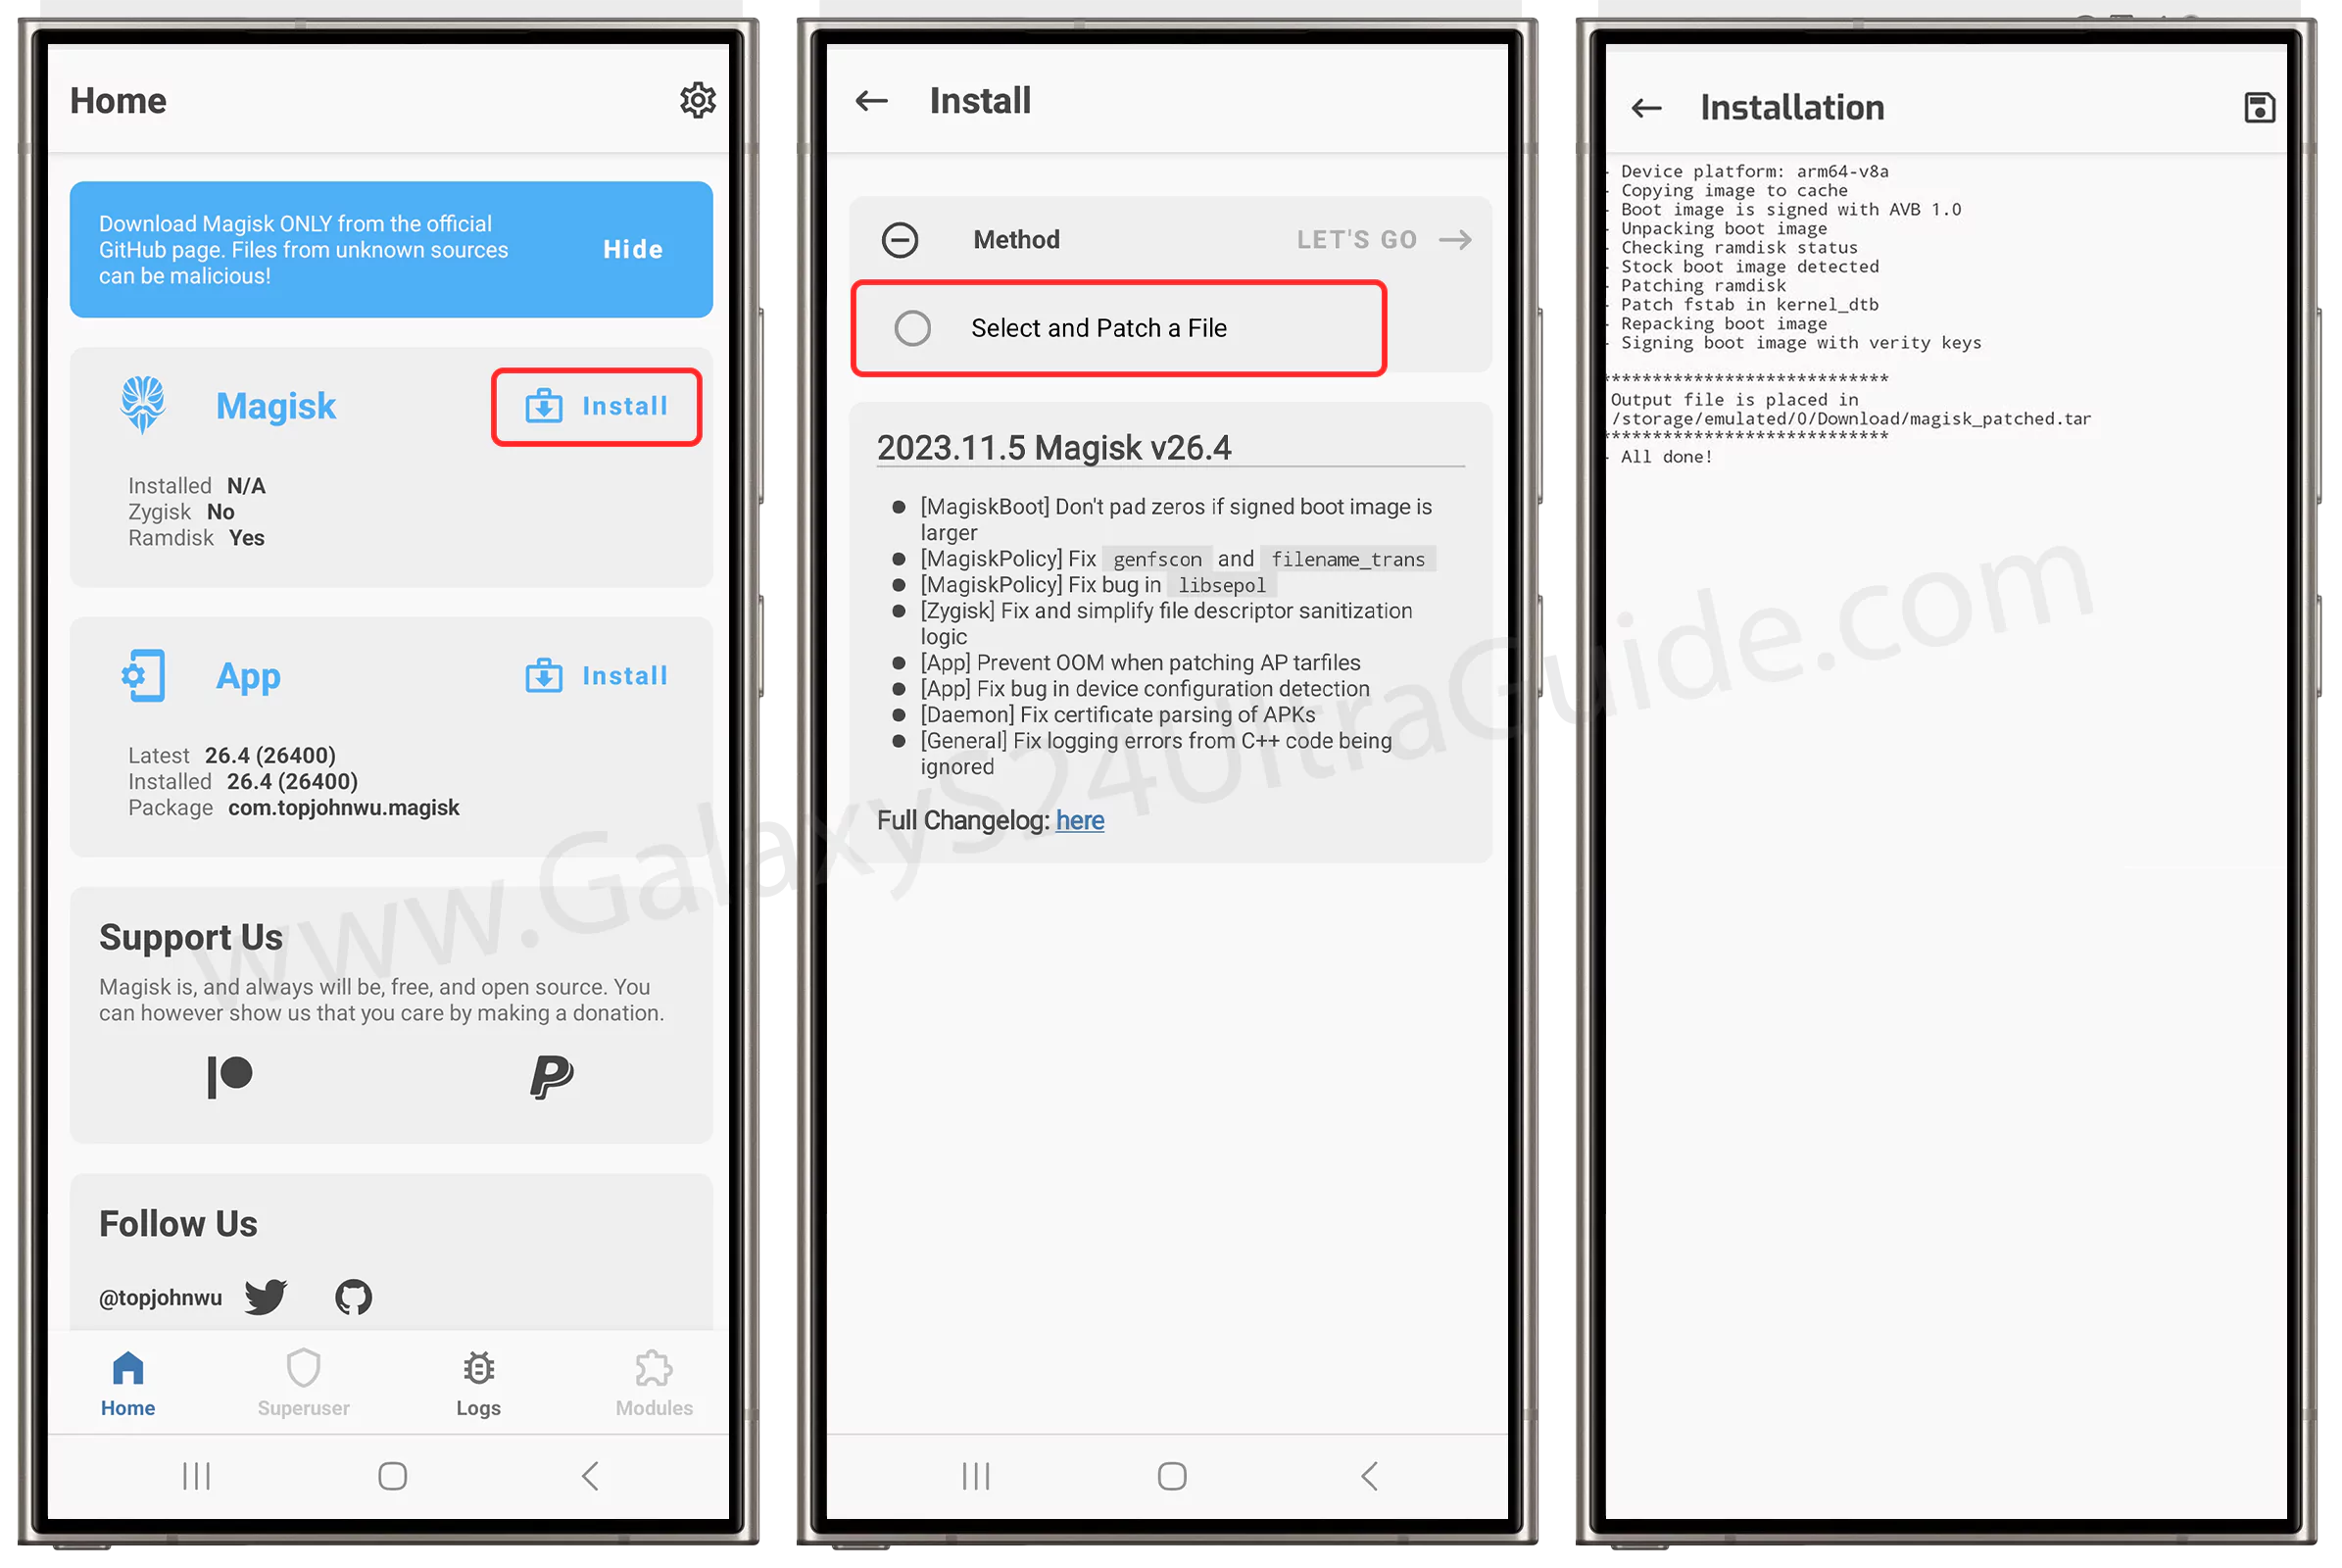
- Lastly, connect your Samsung Galaxy S24 Ultra phone to your PC.
Step 6: Boot to Download Mode
Here are the instructions from which you can effortlessly boot your Samsung Galaxy S24 Ultra into the download mode:
- Turn off your phone using the “Power” button.

- Press and Hold the “Volume Down + Power” buttons simultaneously.
- You need to keep holding and connect your phone to PC/Laptop.
- Now the bootloader warning screen will appear.
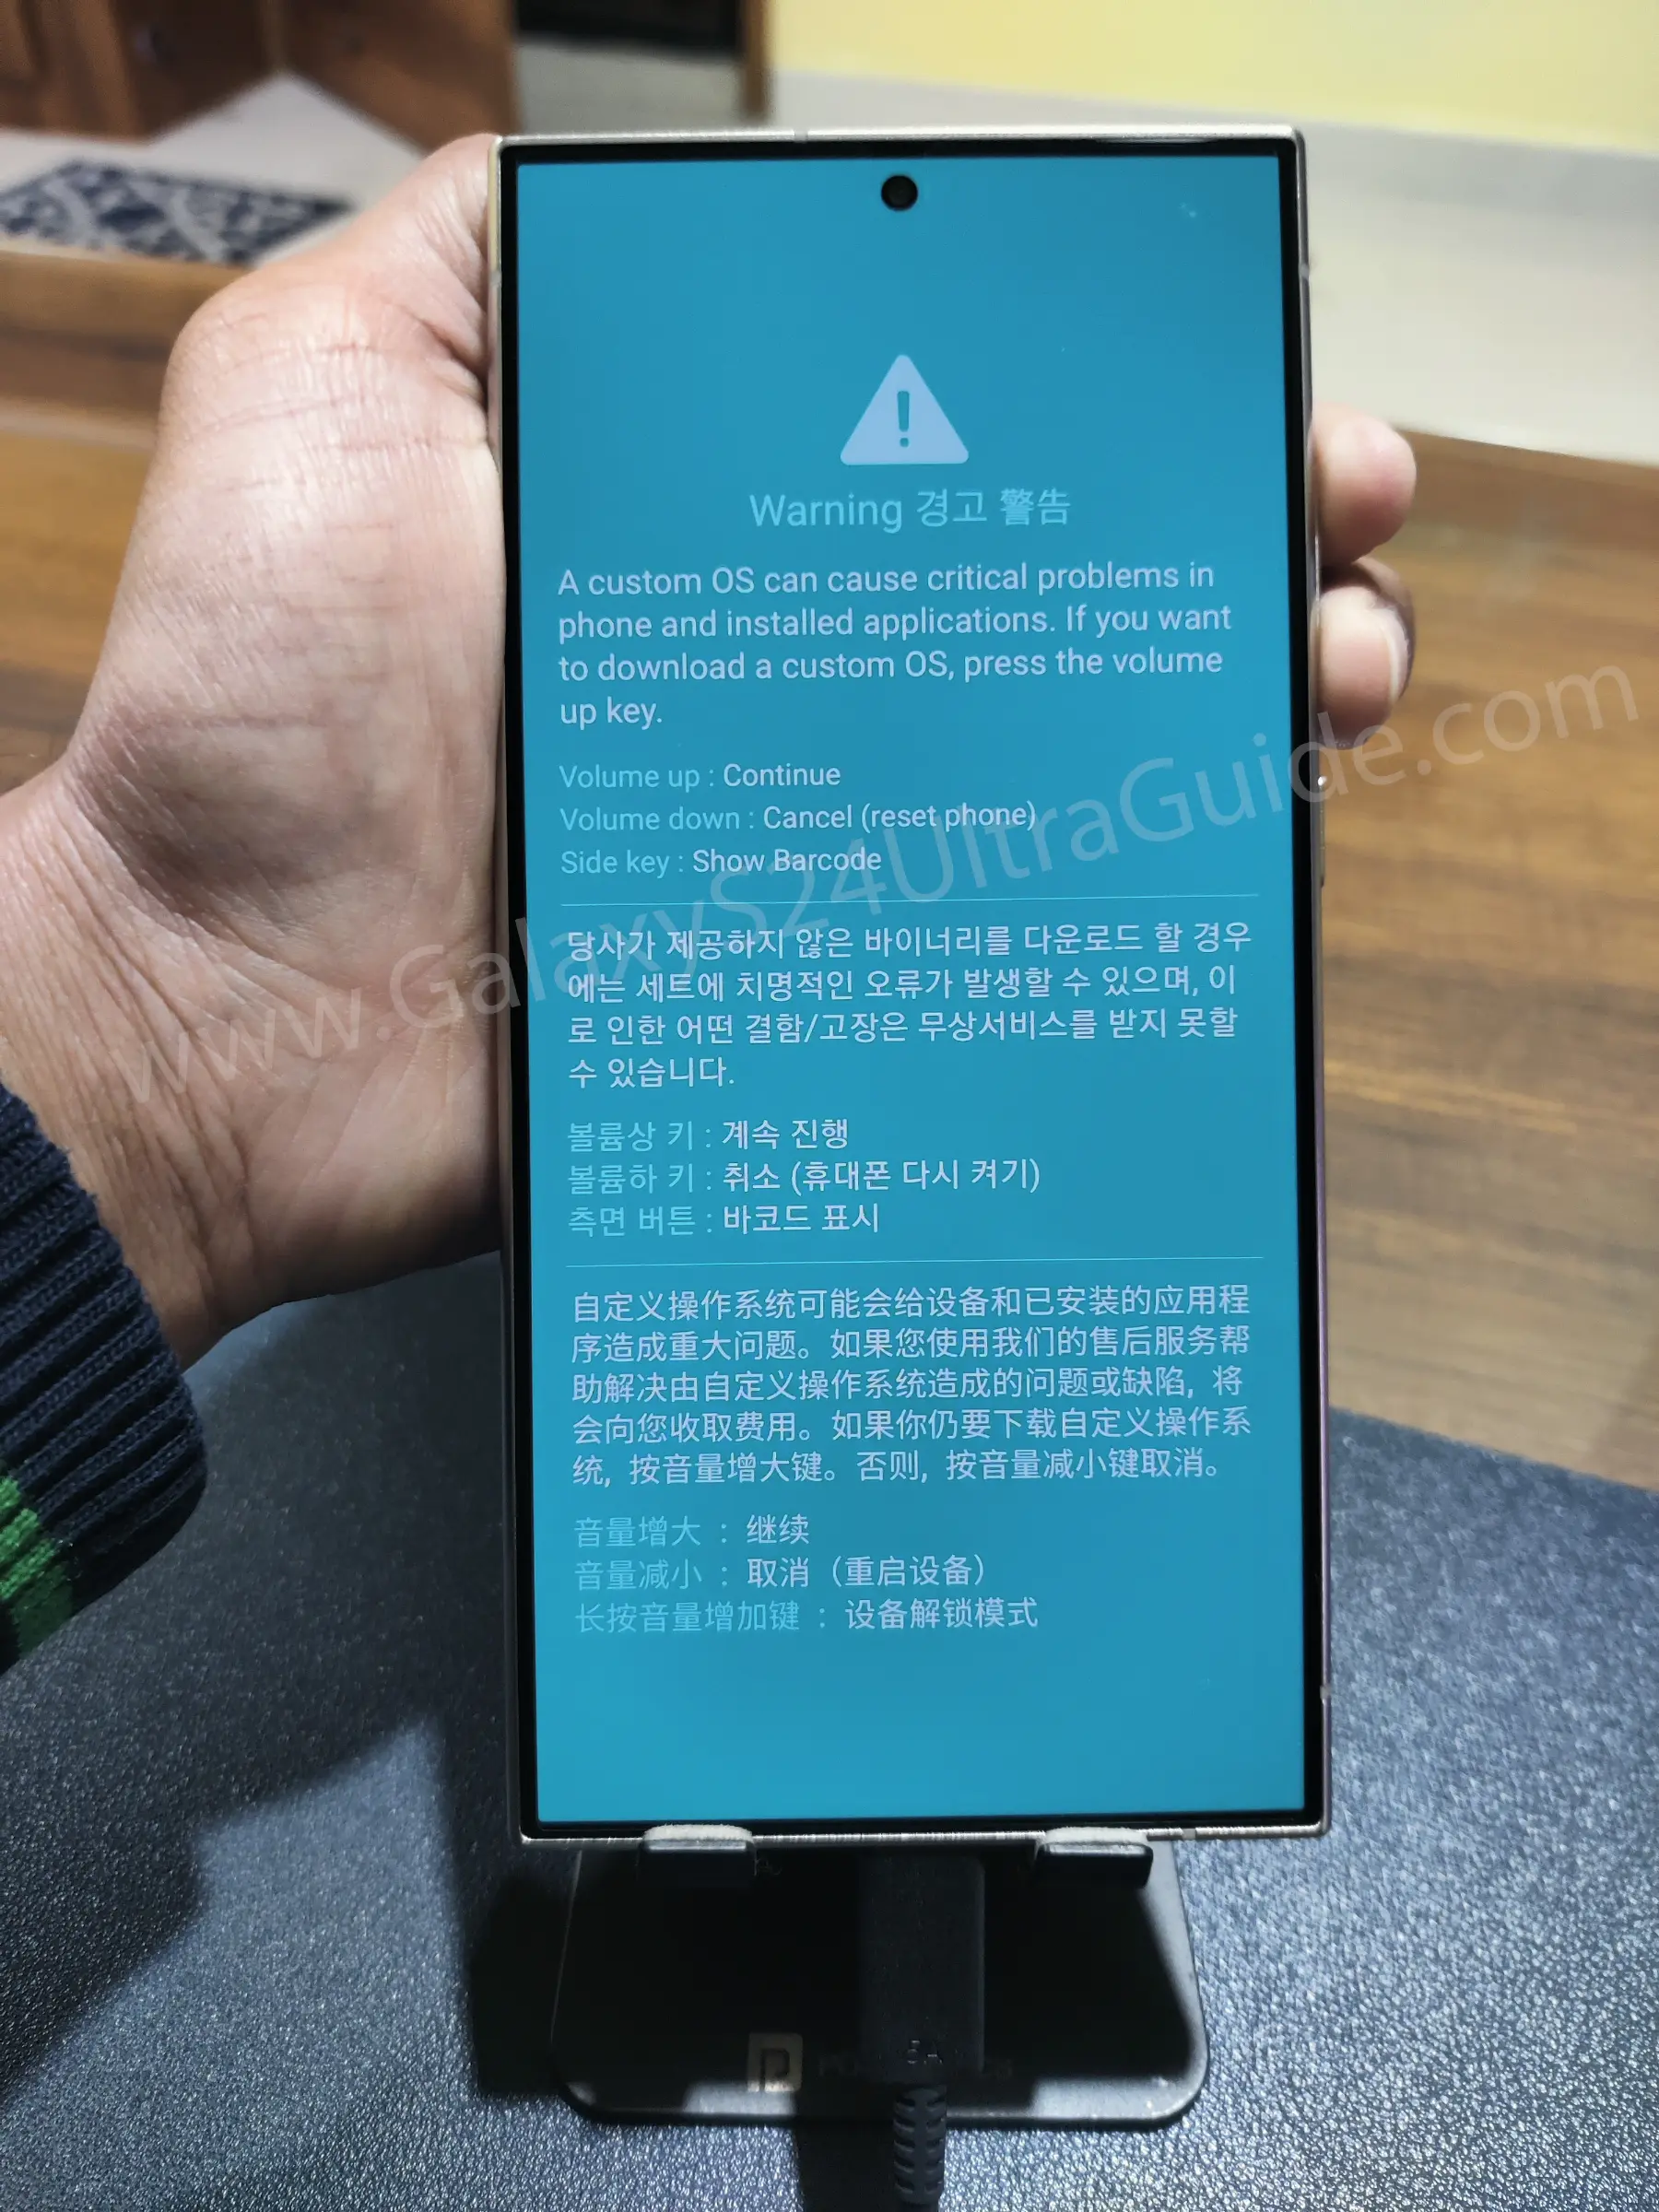
- Press “Volume Up” to access download mode.
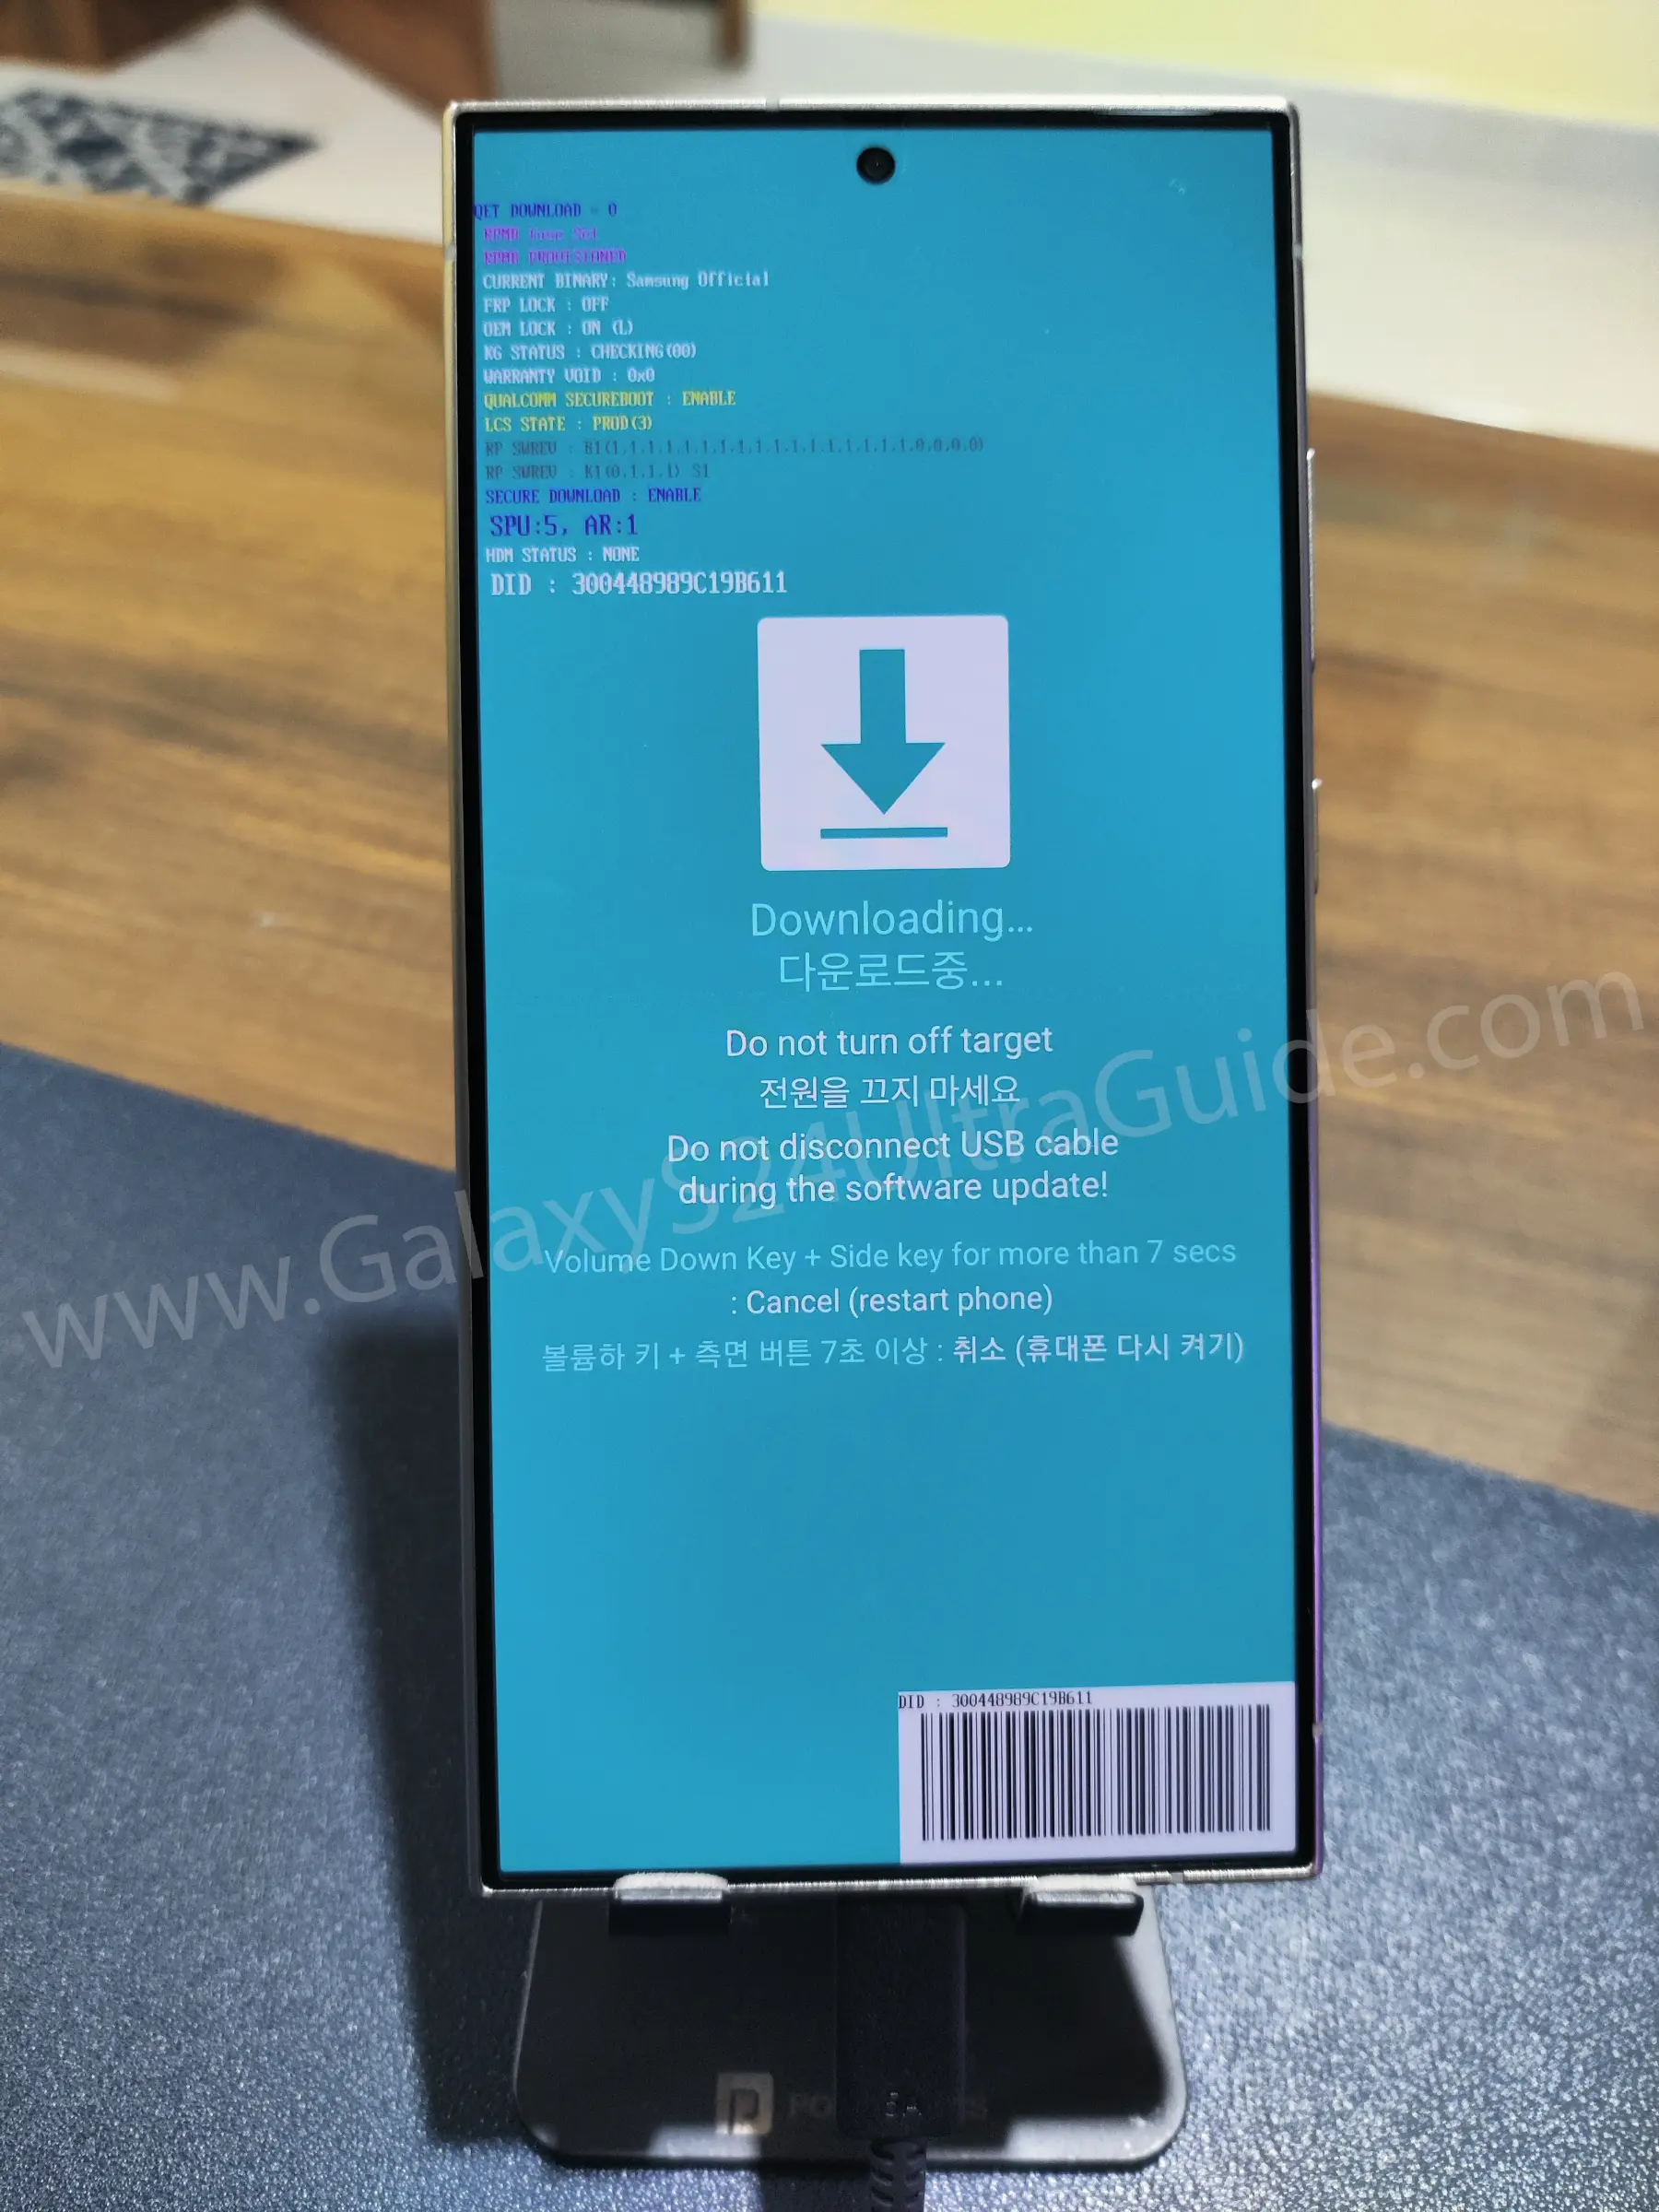
Step 7: Flash Patched AP file using Odin
The flashing process of the magisk patched file will require Odin Tool. From this, you can flash the patched AP firmware file to gain root access to your phone. Therefore, let’s not delay any further and follow the given steps.
- Launch the Odin Tool on your PC/Laptop.
- Make sure to reboot the device into download mode.
- Connect your smartphone to your PC using the data cable.
- You will notice your Samsung Galaxy S24 ultra in the ID: COM section in a blue light box if connected properly.
- Now, you will see multiple file options in the Odin Tool:
- BL: Get the BL file from the firmware folder.
- AP: Add the patched AP firmware file (magisk_patch file)
- CP: Get the CP file from the firmware folder.
- CSC: Get the CSC file from the firmware folder.
- Now, click on the “Start” button to initiate the flashing procedure.
- After a few minutes, the phone will boot up.
- Finally, Install the Magisk App and attain those rooting privileges.
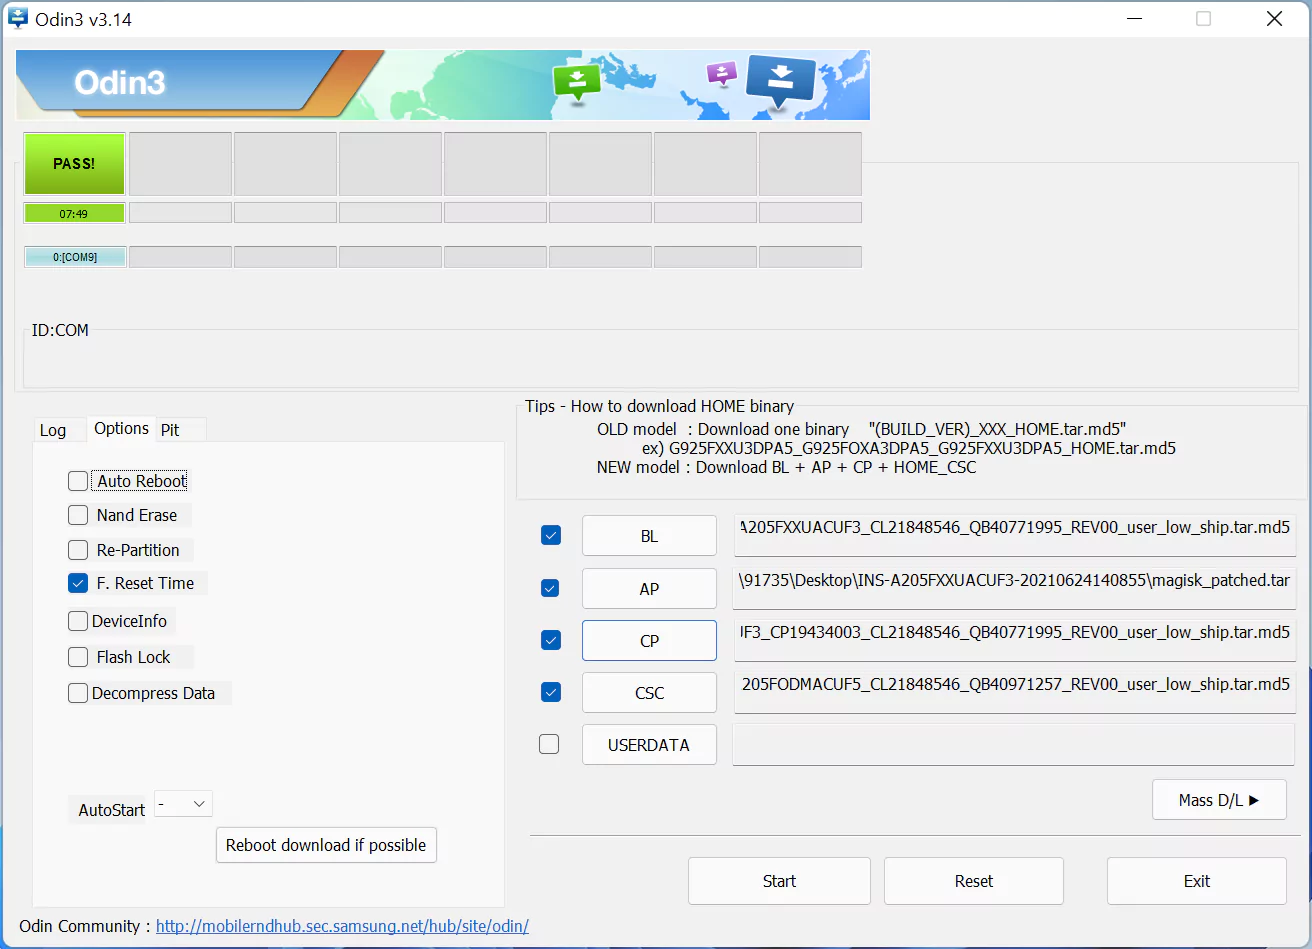
Note: You have to manually install the magisk app on your phone to use the magisk modules and other rooted apps.
Try using the GCam Port on your Galaxy S24 Ultra to make taking pictures better.
Conclusion
Rooting your Samsung Galaxy S24 Ultra can be a tedious task, especially when you are flashing magisk using TWRP or creating a patched magisk file using the Odin tool.
However, the methods featured in this article are the safest procedure to gain those system privileges.
Besides this, we covered important resources and additional guides so that you can pick the relevant method according to your preference. Moreover, we also deliver the necessary files and necessary tools links so that you don’t face any potential errors during the process.
Lastly, read the instructions carefully, and please don’t hesitate to ask your queries in the comment section. We will thoroughly help you!